Unlock Design Brilliance: How to Install Decorative Wall Panels!
Unlock Design Brilliance: How to Install Decorative Wall Panels!
Dreaming of transforming your living space with elegant wall panels but wondering where to begin? This comprehensive guide simplifies the process, showing you exactly how to install decorative wall panels yourself with confidence. We'll demystify DIY installation, empowering you to achieve a professional finish with stunning products like Barrisound Acoustic Solid Wood Slat Wall Panels -Oak. Discover how these premium solid wood panels, including high-quality acoustic wall panels wood, offer both exquisite aesthetics and superior sound dampening, creating a serene and stylish environment. Unlock the core value of a beautifully enhanced home that reflects your personal style.
【Why Decorative Wall Paneling Transforms Your Home】
Elevating Aesthetics and Adding Character
Expert Insight: "Wall panelling is a quick way to add depth and interest to a room, creating big impact with minimal effort," says Olivia Crosher, designer and visual stylist at Naturewall.
Creating Focal Points: Paneling can turn a flat wall into a captivating feature, enhancing perceived thought-out design.
The Power of DIY Home Improvement
Accessibility for All: Wall paneling is an "easy DIY project that almost anyone can take on," making it a popular choice.
Budget-Friendly Luxury: Achieve an elevated, luxurious look without the hefty price tag.
【Choosing the Perfect Decorative Wall Panels for Your Style】
After understanding `how to install decorative wall panels`, the next crucial step is selecting the right panels that align with your aesthetic vision and practical needs. The sheer variety of `wall paneling styles` and materials available in 2025 means there's a perfect match for every home, from cozy traditional spaces to sleek, modern interiors. Choosing wisely ensures your `DIY wall panel project` truly transforms your living area.
Exploring Diverse Wall Paneling Styles
The style of your `decorative panels` significantly impacts the overall ambiance of your room. From time-honored classics to cutting-edge designs, `wall paneling` offers an unparalleled way to infuse personality and architectural charm.
Traditional vs. Contemporary: From classic Tongue and Groove Paneling to sleek, modern Fluted Wall Panels, there's a style for every home aesthetic.
When considering `decorative wall paneling`, your first decision often revolves around traditional or contemporary aesthetics. `Tongue and Groove Paneling`, with its interlocking wood or MDF planks, offers a classic, rustic, or cottage-core feel, often seen in cozy dens or sunrooms. This `panel style` adds warmth and a timeless appeal. In contrast, `modern wall panel designs` often feature clean lines and minimalist profiles. `Fluted Wall Panels`, characterized by their ribbed or reeded surfaces, are a prominent contemporary choice. These `sleek wall panels` create captivating shadow play and add sophisticated texture, making them ideal for modern living rooms or accent walls.
Architectural Interest: Shaker Style Paneling and Jacobean-style grids add historical depth to new builds, preventing a "generic" feel.
For those looking to imbue `architectural interest` and a sense of history into a home, especially newer constructions that might feel "generic," specific `paneling styles` stand out. `Shaker Style Paneling`, known for its clean, recessed flat panels and simple frame, offers a timeless, understated elegance. It's incredibly versatile and can adapt from farmhouse chic to transitional designs. On the other hand, `Jacobean-style grids` or `geometric wall panels` create a more intricate, stately appearance, often featuring raised or applied molding patterns that form captivating `decorative grid patterns`. These `historical wall panel designs` add significant character and depth, transforming a plain wall into a focal point rich in visual narrative.
Material Selection and Practicality
Beyond aesthetics, the `material selection` for your `decorative wall panels` is vital for durability, maintenance, and suitability for specific environments. Practicality should always go hand-in-hand with design.
Versatility of MDF Wall Panels: Moisture-resistant MDF sheeting is ideal for spaces like bathrooms, preventing warping in steamy environments.
`MDF Wall Panels` (Medium-Density Fiberboard) are celebrated for their incredible `versatility` and affordability. Unlike solid wood, `MDF sheeting` offers a smooth, uniform surface that is perfect for painting and achieving a flawless finish. Crucially, `moisture-resistant MDF` varieties are specifically engineered to withstand humid conditions. This makes them an `ideal wall panel solution` for spaces prone to steam and moisture, such as bathrooms, laundries, or even kitchens. Using `water-resistant wall panels` made from treated MDF effectively `prevents warping` and ensures the longevity of your `wall decor` in challenging environments.
Reclaimed Wood and Vertical Wall Slats: Embrace eco-friendly options or create a sense of height in smaller spaces with Vertical Wall Slats.
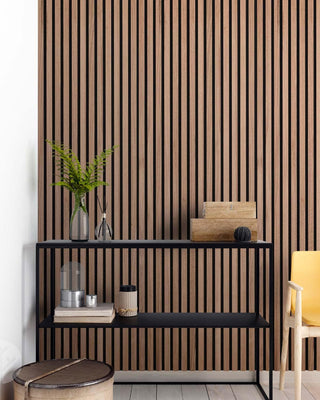
For those prioritizing sustainability, `reclaimed wood wall panels` offer a stunning and `eco-friendly wall panel option`. Sourced from old barns, factories, or demolished buildings, `reclaimed timber panels` carry a unique history and character, with variations in grain, color, and texture that cannot be replicated. Each `reclaimed wood plank` tells a story, making your `wall paneling` truly one-of-a-kind. Additionally, `Vertical Wall Slats` are a popular choice for their ability to influence spatial perception. Installing `vertical slat panels` draws the eye upwards, visually `creating a sense of height in smaller spaces` or rooms with lower ceilings. This `design trick` makes a room feel more expansive and airy. These `slatted wall panels` can be crafted from various materials, including natural wood, MDF, or even metal, offering both aesthetic appeal and, often, acoustic benefits.
Considering `wood slat paneling` for your `wall design` opens up a world of possibilities, offering both visual appeal and potential acoustic enhancements, making it a `practical decorative choice`. To explore premium wood options that combine elegant design with superior sound management, consider visiting Barrisound Acoustic Solid Wood Slat Wall Panels -Oak, where you can find high-quality panels to elevate your space.
【Essential Preparation for Seamless Wall Panel Installation】
Embarking on a `DIY wall panel project` requires meticulous `preparation`. A well-prepared workspace and a comprehensive understanding of the `installation process` are key to achieving a `seamless wall panel installation`. This foundational `preparation phase` is crucial for anyone learning `how to install decorative wall panels` effectively and safely.
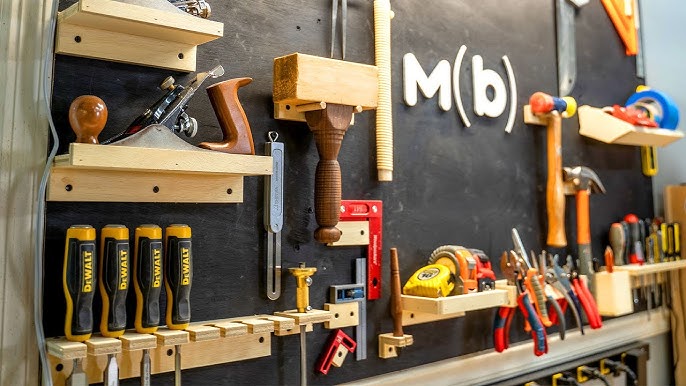
Gathering Your Toolkit for DIY Success
Before you even think about cutting or attaching your beautiful new `decorative panels`, you need the right `equipment`. Having all your `essential tools` ready saves time and prevents frustration, ensuring your `wall panel installation` proceeds smoothly.
Key Tools: You'll need a pipe, cable & stud detector, spirit level, drill, jigsaw, circular saw, clamps, tape measure, pencil, and a stepladder.
Before cutting or attaching anything, ensure you have all the necessary `installation tools` and materials. This prevents interruptions and makes the process seamless. You'll need:
- Your chosen decorative wall panels: Whether `wood slat panels`, MDF, or PVC, ensure you have enough to cover your area, plus 10-15% extra for cuts and mistakes.
- Measuring tape and pencil: For accurate markings.
- Spirit level or laser level: Crucial for ensuring your panels are perfectly straight and level.
- Stud finder: To locate wall studs for secure fastening, especially important for heavier `wall coverings`.
- Saw: A miter saw or circular saw for precise cuts. A jigsaw is useful for intricate cuts around outlets.
- Construction adhesive: High-quality adhesive designed for paneling.
- Nail gun (optional) and nails/screws: For additional securement, particularly for `slat wall panels` or thicker materials.
- Caulk gun: For applying adhesive and sealant.
- Sandpaper: For smoothing edges if needed.
- Utility knife: For scoring and precise cuts on certain materials.
- Safety gear: Glasses, gloves, and a dust mask.
Safety First: Always wear safety goggles and a dust mask when cutting or drilling.
Your personal `safety` is paramount when undertaking any home improvement task, especially when `cutting or drilling` `wall panel materials`. Always prioritize `safety precautions` by wearing `safety goggles` to protect your eyes from dust and debris. A `dust mask` is equally important to safeguard your lungs from fine particles, particularly when working with MDF or wood. Embracing these simple `safety measures` ensures a secure and pleasant `DIY experience`.
Critical Pre-Installation Checks
Before any `decorative wall panel` touches the surface, `critical pre-installation checks` are imperative. These `preparation steps` help prevent costly mistakes and guarantee the stability and longevity of your `wall paneling`.
Wall Inspection: Use a stud detector to mark timber frame wall positions and check for pipes or cables.
A thorough `wall inspection` is the cornerstone of successful `wall panel installation`. Utilize your `stud detector` to accurately `mark timber frame wall positions`. This is where you'll securely anchor your `wall panels`. More importantly, the detector will help you `check for hidden pipes or electrical cables` within the walls. Identifying these `utility lines` beforehand is crucial for `safety`, preventing accidental punctures or electrical hazards during drilling or cutting. Understanding your wall's `structural integrity` is a non-negotiable step.
Leveling Considerations: Be mindful of uneven flooring; adjust cabinet legs (or panel supports) to ensure a perfectly level base.
Even the slightest `uneven flooring` can throw off the entire `alignment` of your `decorative wall panels`. Pay close attention to `leveling considerations` from the outset. If you're installing panels above existing structures, like `cabinets` or `baseboards`, ensure these `panel supports` are perfectly level. You may need to `adjust cabinet legs` or use shims to create a `perfectly level base` for your initial row of panels. This painstaking `horizontal adjustment` guarantees that subsequent panels follow a straight line, culminating in a professional and visually appealing finish for your `wall design`.
For those seeking to combine stunning visuals with superior acoustic performance in their `wall paneling` project, exploring high-quality options is the next logical step. Barrisound Acoustic Solid Wood Slat Wall Panels -Oak offers an exceptional choice for elevating your space, delivering both elegant design and effective sound management.
【Step-by-Step Guide: How to Install Decorative Wall Panels】

With your preparation complete and tools at the ready, it's time to delve into the practical steps of `installing decorative wall panels`. This `step-by-step guide` will walk you through `how to install decorative wall panels` effectively, ensuring a professional and stunning finish for your `wall paneling project` in 2025.
Mastering the Art of Attaching Wall Panelling
The initial phase of `wall panel installation` involves careful `layout` and `secure fastening`. Precision in these early `attachment steps` is fundamental to the overall success and aesthetic appeal of your `wall panelling`.
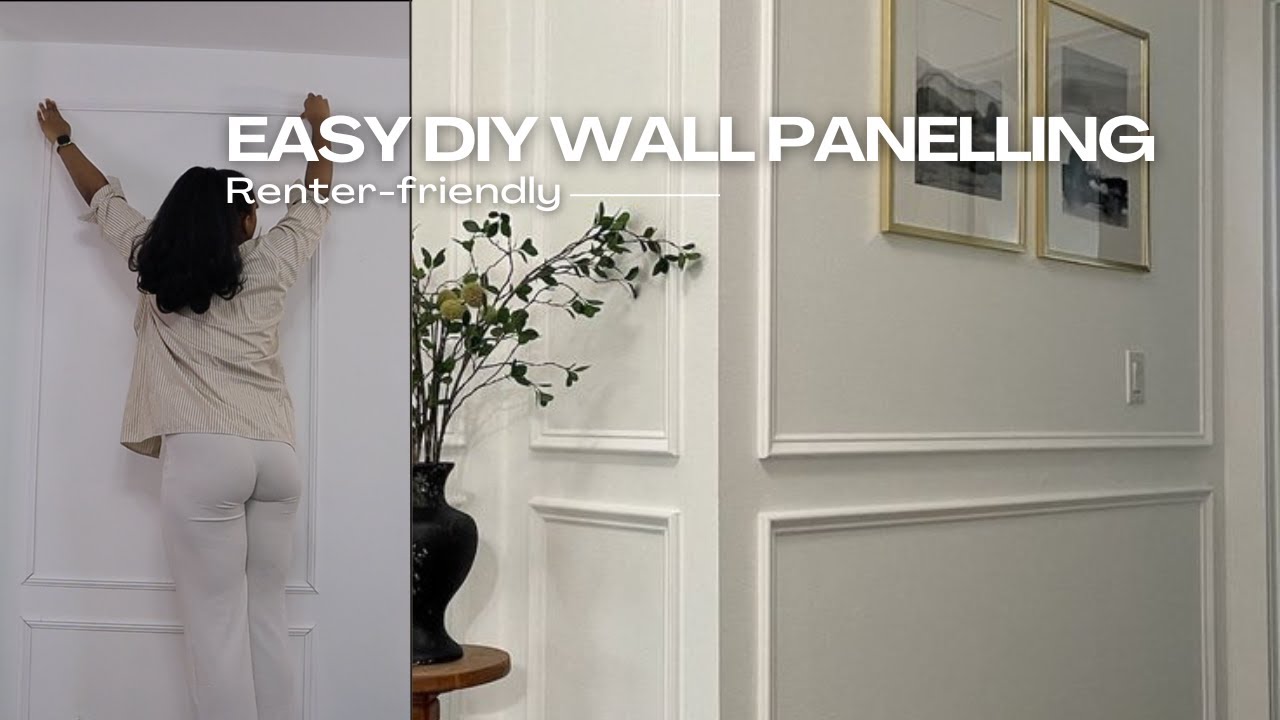
Layout and Marking: Begin in a corner, drawing a precise line for the panel's top or bottom edge using a spirit level and pencil.
Successful `decorative wall panel installation` begins with an accurate `layout`. Start your `panel placement` in a prominent corner, or the most visible part of your wall, to ensure `seamless alignment`. Use a `spirit level` to draw a precise vertical or horizontal line on the wall with a `pencil`, which will serve as the guide for the top or bottom edge of your first `wall panel`. This initial `marking` is critical; any deviation here can ripple through the entire `paneling project`, affecting subsequent `panel alignment`. Double-check your `measurements` to guarantee everything is perfectly plumb and level.
Secure Fastening: For attaching strips, "Use a suitable wall adhesive on to the back face of each strip, a spirit level will make sure your strips are square, secure with a nail gun into place," advises Zoe Goff, product manager at Richard Burbidge.
Once your `layout` is marked, it’s time for `secure fastening`. For `attaching strips` or `panel sections`, a combination of `wall adhesive` and mechanical fasteners is often recommended for maximum `stability`. As Zoe Goff, product manager at Richard Burbidge, advises, "Use a suitable `wall adhesive` on to the back face of each strip, a `spirit level` will make sure your strips are square, secure with a `nail gun` into place." Apply the `adhesive` evenly to the back of the `decorative panel` or `strip`, then carefully position it against your marked line. Use your `spirit level` again to ensure the strip is perfectly `square` before using a `nail gun` to `secure` it firmly to the wall, ideally into `studs` you've previously marked. This `panel attachment` method ensures both strong `adhesion` and robust `anchoring`.
Precision in Placement and Finishing
Achieving a truly professional look when `installing decorative wall panels` hinges on `precision` in `panel placement` and attention to crucial `finishing details`.
Corner and Adjacent Panel Alignment: Clamp adjacent panels together and drill/screw from the inside of the cabinet/panel for a hidden, seamless attachment.
For a polished and cohesive `wall design`, `corner` and `adjacent panel alignment` are paramount. When working with panels that form a corner or butt up against each other, consider `clamping adjacent panels` together before final `fastening`. This helps eliminate gaps and ensures a tight, `seamless attachment`. For `hidden fasteners` or when installing `panels` inside cabinets, you can `drill` and `screw` from the inside of the cabinet or the back of the `panel`. This `invisible fixing` technique ensures that no `screw heads` are visible, enhancing the overall clean and `seamless` appearance of your `decorative wall paneling`. This level of `precise fit` elevates the quality of your `panel installation`.
Decorative Panels and Skirting Boards: Trim decorative panels to fit perfectly, including cutting around skirting boards for a professional finish.
One of the more intricate aspects of `wall panel installation` is `trimming decorative panels` to `fit perfectly` around existing features like `skirting boards` (also known as `baseboards`). This requires careful `measurement` and `cutting`. Mark the outline of the `skirting board` onto the back of your `decorative panel`, then use a `jigsaw` or `coping saw` to `cut around` the shape with precision. Taking your time with these `custom cuts` ensures a tight, professional `finish` where the `panel` integrates smoothly with the `baseboard`. This meticulous `finishing detail` is key to making your `wall panels` look like a custom-built feature rather than an afterthought, significantly enhancing your `wall design`.
For those seeking to elevate their space with not just beautiful but also acoustically superior `wall panels` that are straightforward to install, exploring high-quality options is a valuable step. `Barrisound Acoustic Solid Wood Slat Wall Panels -Oak` offers an exceptional choice for homeowners looking for `decorative panels` that deliver both elegant aesthetics and effective sound management, making your `DIY wall panel project` a resounding success. You can learn more about how these stunning `acoustic wall panels` can transform your home by visiting Barrisound Acoustic Solid Wood Slat Wall Panels -Oak.
【Creative Wall Paneling Ideas to Enhance Any Room】
Once you've mastered `how to install decorative wall panels`, the real fun begins: exploring the myriad of `creative wall paneling ideas` that can utterly transform any space. Moving beyond basic `panel installation`, this section delves into innovative `wall design` concepts that elevate `room aesthetics` and functionality, ensuring your `paneling project` truly shines in 2025.
Designing for Perceived Space and Mood
Understanding `decorative wall panels`' impact on `space perception` and `room mood` is key to their effective use. Strategic `panel placement` and selection can dramatically alter how large or cozy a room feels, enhancing its overall `visual appeal`.
Does Wall Paneling Make a Room Look Bigger? Yes, "vertical planks... draw your eye upwards towards the ceiling." For small spaces, "Keep the panels thin to avoid closing things in," suggests Olivia Crosher.
Yes, `wall paneling` can absolutely make a `room look bigger` or taller when used thoughtfully. `Vertical planks` are particularly effective in this regard, as they naturally "draw your eye upwards towards the ceiling," creating an illusion of increased height and expansiveness. This vertical `panel orientation` extends the perceived height, making the `interior space` feel more open and airy. For `small spaces`, precision is vital. As interior designer Olivia Crosher suggests, "Keep the panels thin to avoid closing things in." Choosing `slimmer panels` prevents the room from feeling overly burdened or cramped, maintaining a sense of openness while adding architectural detail. This strategic `panel selection` is crucial for maximizing `room size perception`.
Color and Texture: Enhancing Depth
The `color` and `texture` of your `decorative wall panels` play a significant role in influencing a room's `mood` and `perceived depth`. Darker hues, such as `black` or `charcoal`, can subtly "recede into the background and make the space feel bigger." This clever `color choice` creates a sense of greater distance, adding an unexpected `depth` to your `wall design`. Conversely, light, bright `panels` can make a room feel more open and luminous. Furthermore, `textured wall decor`, whether it's grooved, ribbed, or reclaimed wood, adds layers of `visual interest` and tactile appeal. These `textured panels` absorb and reflect light differently, enriching the room's `aesthetic` and providing a sophisticated backdrop for your `interior design`.
Innovative Applications and Accents
Beyond covering entire walls, `decorative wall panels` offer incredible versatility for `innovative applications` and `accent features`. Their adaptability allows for unique expressions of `wall art` and `architectural detail` throughout your home.
Beyond Standard Walls: Creative Uses
Think beyond conventional `wall covering`. `Decorative wall panels` can be ingeniously utilized to `frame artwork` or `windows`, creating bespoke architectural elements that draw the eye and highlight specific features. Imagine a `panel surround` that elegantly outlines a beloved painting or a window with a scenic view. For more functional `room enhancement`, consider using `panels` to create a `French cane room divider`, offering a stylish and practical way to zone open-plan living areas without permanent walls. In bathrooms, moisture-resistant `paneling` serves as a `unique alternative to tiles`, offering a warmer, more seamless look while providing durability and ease of maintenance, redefining `bathroom panels`. These unconventional `paneling projects` showcase the material's adaptive nature.
Feature Walls: Making a Statement
A `feature wall` or `accent wall` crafted from `decorative wall panels` can be the focal point of any room, injecting personality and drama. Transform a `chimney breast` into a stunning architectural element with `rustic panels` for a cozy, inviting feel, or use sleek, modern `slat panels` for a contemporary edge. In the bedroom, `paneling in place of a headboard` offers a striking and custom `bedroom wall paneling statement`. This creates a seamless and sophisticated backdrop for your bed, integrating the `wall design` directly into the furniture. Such `wall paneling ideas` are not just about `decoration`; they're about creating an immersive `interior design` experience, turning ordinary spaces into extraordinary ones in 2025.
【Troubleshooting and Budget-Friendly Decorative Wall Paneling Tips】
Even after mastering `how to install decorative wall panels` and exploring `creative wall paneling ideas`, practical considerations like budget and ongoing maintenance are crucial for any `home improvement project`. This section offers valuable `wall paneling tips` and `smart solutions` to address common `installation questions` and ensure your `decorative panels` remain a stunning feature for years to come in 2025.
Smart Solutions for Cost-Effective Paneling
Achieving a high-end `wall design` doesn't always require a high budget. With smart choices and a bit of DIY spirit, `decorative wall panels` can be an incredibly `cost-effective` way to enhance your `interior space`.
The Cheapest Way to Panel a Wall: "The cheapest way will always be to panel the wall yourself," saving labor costs. Inexpensive materials like MDF or reclaimed pallet wood can be transformed with "a quick sand and a lick of paint."
When considering `budget-friendly wall paneling`, the most significant saving often comes from `DIY installation`. As the expert insight suggests, "The cheapest way will always be to panel the wall yourself," eliminating professional `labor costs`. This hands-on approach to `paneling projects` puts you in control of your expenses. For `inexpensive materials`, consider readily available options like `MDF` (Medium-Density Fibreboard) or even `reclaimed pallet wood`. These materials, while affordable, offer immense potential for transformation. A simple "quick sand and a lick of paint" can turn basic `MDF panels` or rustic `reclaimed wood` into sophisticated `wall features`, proving that `cost-effective wall decor` can still deliver a high-impact `aesthetic`.
Wall Panelling vs. Wallpaper: Consider wood panel-effect wallpaper for a budget-friendly and labor-saving alternative without the DIY effort, offering versatile designs.
For those seeking a `budget-friendly` and less labor-intensive `alternative` to traditional `wood wall paneling`, `wood panel-effect wallpaper` is an excellent consideration. This `decorative solution` offers the visual appeal of `paneling` without the `DIY effort` and material cost associated with solid `panels`. Modern `panel-effect wallpapers` come in a vast array of `versatile designs`, from classic wainscoting to contemporary `slat panel` looks, making it easy to find a style that complements your `room aesthetics`. While `wallpaper` doesn't provide the same `tactile depth` or `acoustic benefits` as actual `paneling`, it's an undeniable `cost-saving choice` for transforming `room interiors` quickly and efficiently.
Addressing Common Installation Questions
Successfully installing `decorative wall panels` involves understanding the nuances of `panel attachment` to various `wall surfaces` and implementing proper `aftercare` to preserve their beauty and functionality.
Attaching Panels to Different Surfaces: For rental properties, removable command strips can be used, while heavier items require appropriate fixings and masonry drills for brick walls.
The method for `attaching decorative panels` varies significantly depending on the `surface type` and the nature of your living situation. For instance, in `rental properties` where permanent alterations are restricted, `removable command strips` can be an ideal solution for `lightweight panels`, allowing for `temporary wall decor` without damaging the underlying surface. However, for `heavier items` like `solid wood wall panels` or more substantial `MDF designs`, `appropriate fixings` are essential for `secure panel attachment`. This often means using screws, `adhesive`, or a combination, depending on the panel type and `wall material`. For `brick walls` or other `masonry surfaces`, a `masonry drill` and suitable wall plugs will be required to ensure the `panels` are firmly anchored, preventing any movement or detachment.
For those considering high-quality, solid wood `slat wall panels` like the Barrisound Acoustic Solid Wood Slat Wall Panels - Oak, which offer both beauty and acoustic benefits, understanding proper attachment methods is paramount. These `premium panels` provide excellent `sound absorption` and a stunning `aesthetic upgrade` to any room, making the initial `installation` `durable` and `secure`. Ensuring proper installation for such `sound-dampening panels` means they will function optimally in providing both `acoustic comfort` and `visual appeal`. Explore Barrisound's solid wood slat panels to see how quality materials meet easy installation.
Aftercare Best Practices: A few weeks after installation, check all fixings and adjust if necessary, and use appropriate cleaning products to maintain your Wall Paneling.
Once your `decorative wall paneling` is installed, proper `aftercare` ensures its `longevity` and maintains its pristine appearance. A crucial `maintenance tip` is to perform a `fixings check` a few weeks after the initial `installation`. This allows you to identify and `adjust` any `panels` that might have settled or shifted slightly, ensuring they remain perfectly aligned and securely fastened. Regular `panel upkeep` also involves using `appropriate cleaning products`. For most `painted` or `veneered panels`, a soft, damp cloth with a mild cleaner is sufficient. Avoid harsh chemicals or abrasive scrubbers, which can damage the `panel finish`. For `natural wood panels`, specific `wood cleaning products` or polishes might be recommended to preserve their luster. Consistent `wall panel maintenance` protects your investment and keeps your `room aesthetics` looking fresh and inviting in 2025.
Embarking on a decorative wall panel project might seem daunting at first, but as this comprehensive guide illustrates, it's an incredibly rewarding endeavor achievable with careful planning and execution. We've walked through every critical phase, from the essential preliminary preparations, including gathering your precise tools and meticulously preparing your walls, to the nuances of accurate measurement and safe cutting. Understanding how to install decorative wall panels effectively hinges on these foundational steps, ensuring a seamless and professional outcome.
The installation process itself, involving the strategic application of adhesives and fasteners, followed by diligent leveling and secure panel placement, forms the backbone of a successful wall transformation. Beyond the practicalities of installation, we explored the vast array of creative possibilities, from choosing the perfect panel style—be it traditional tongue and groove or sleek modern fluted designs—to understanding the practical benefits of various materials like versatile MDF or eco-friendly reclaimed wood. We also discussed how strategic paneling, especially vertical slats or lighter colors, can influence perceived room size and mood, demonstrating how design choices can enhance depth and visual appeal.
Finally, we delved into smart, budget-friendly solutions, comparing DIY approaches with cost-effective alternatives like panel-effect wallpaper, and addressed crucial common installation questions, including attaching panels to diverse surfaces and implementing best practices for aftercare. This holistic view empowers you not only to install panels but to maintain their beauty and functionality for years to come.
Ultimately, mastering how to install decorative wall panels empowers you to elevate your interior spaces, infusing them with architectural interest, unique textures, and a profound sense of personal style. Whether you opt for simple, painted MDF or invest in premium options like Barrisound Acoustic Solid Wood Slat Wall Panels -Oak to combine stunning aesthetics with superior sound management, the journey of transforming your home is now within your grasp. Embrace these insights, select the perfect materials, and confidently create a beautifully enhanced environment that resonates with your vision. Your dream interior is just a few panels away, ready to make a significant statement in 2025.