How to Install Slat Wall Panels?
Dreaming of transforming your space with modern aesthetics and enhanced acoustics? Discover how simple it is to upgrade your home with elegant wall paneling. This guide will demystify the entire process of how to install slat wall panels, ensuring a professional-looking finish for your next home improvement project. Specifically, we’ll highlight the ease and benefits of using premium options like Barrisound Acoustic Solid Wood Slat Wall Panels - Smoked, known for their exceptional sound dampening and luxurious appeal. Whether you're enhancing a living room or creating a serene home office, mastering the installation of slatted wood wall panels brings significant value, merging visual elegance with superior acoustic performance.
Unlock Stunning Walls: Your Ultimate Guide on How to Install Slat Wall Panels
【Embarking on Your Slat Wall Panel Journey】

Installing slat wall panels can dramatically transform any space, offering a blend of sophisticated aesthetics and enhanced acoustics. For homeowners and DIY enthusiasts looking for a significant yet manageable home improvement project in 2025, understanding the complete process of `how to install slat wall panels` is essential. This guide will walk you through the initial considerations, ensuring you're well-prepared before you even pick up a tool.
Understanding the Allure of Slat Wall Paneling
Slat wall paneling has rapidly become a favored choice for modern interiors. Its appeal lies not just in its stunning visual impact but also in its practical benefits. People are actively searching for ways to upgrade their living environments, and `slat wall panels` offer a versatile solution.
The Transformative Power of Wall Paneling: Aesthetics and Acoustics
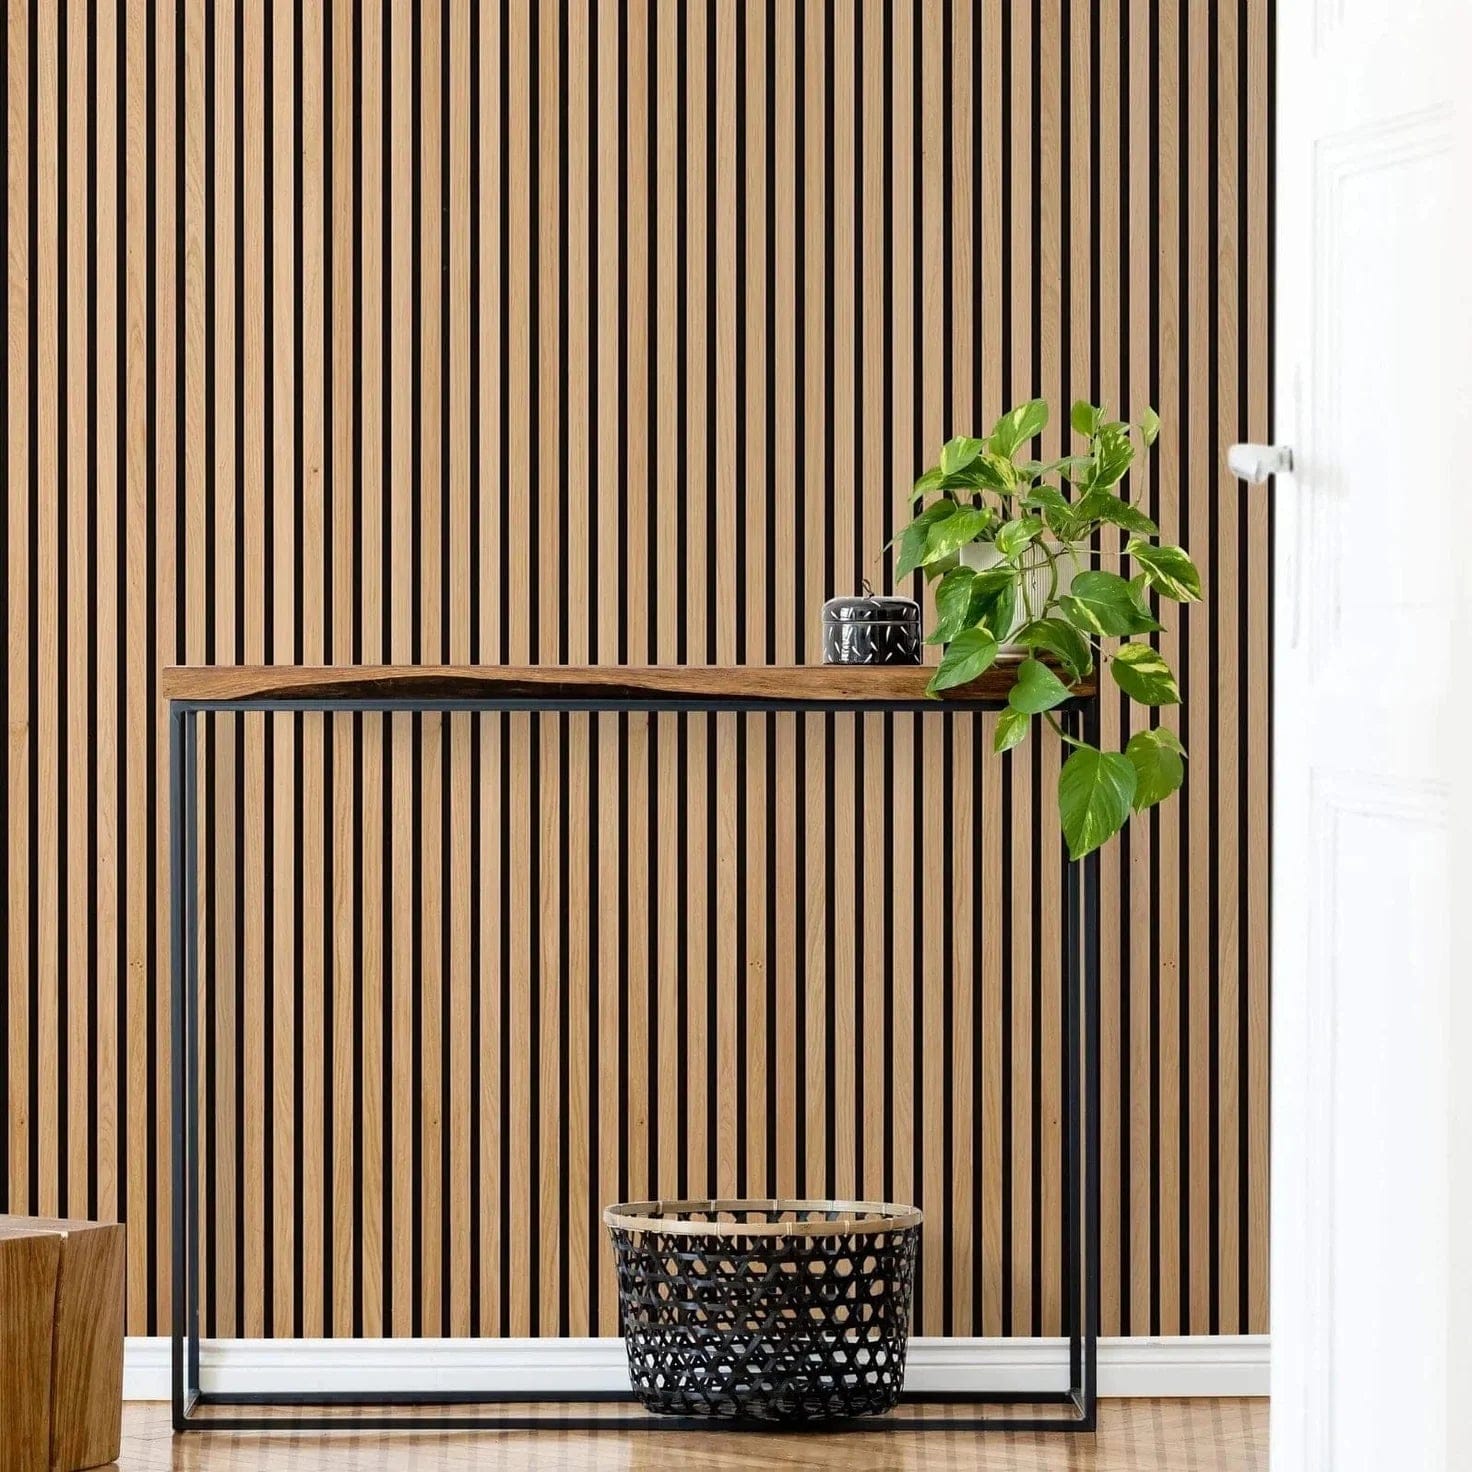
The primary draws of `wall paneling` are its aesthetic appeal and acoustic properties. Visually, these panels add texture, depth, and a contemporary linear design that elevates any room. They create a focal point, breaking up monotonous wall surfaces and introducing an element of high design. Beyond their `visual appeal`, many slat panels, especially those with felt backing, serve as excellent `acoustic treatment`. They absorb sound waves, reducing echo and reverberation, which is crucial for creating more comfortable and quieter living spaces, home theaters, or offices. This `soundproofing` capability makes them a smart choice for areas where noise reduction is desired, improving overall `room acoustics`.
Why Modern Wall Panel Installation Techniques are Trending for Home Improvement
The surging popularity of `modern wall panel installation` techniques in 2025 is largely due to advancements in panel design, making `DIY wall paneling` more accessible than ever. Gone are the days of complex, custom millwork. Today's `slat panel systems` are often modular and designed for straightforward assembly, appealing directly to the `home renovation trends` focusing on quick, impactful upgrades. This ease of `panel installation` allows homeowners to achieve professional-looking results without needing extensive construction experience, empowering them to tackle their `interior design` aspirations with confidence.
Choosing Your Slat Wall Panels: A Pre-Installation Guide
Before you dive into the specifics of `how to install slat wall panels`, the very first step is making informed choices about the panels themselves. This `pre-installation guide` is crucial for a successful outcome, as your selection will dictate the appropriate `installation methods` and tools required. The right `panel selection` can significantly simplify your entire project.
Exploring Slat Wall Panel Types Installation Methods and Materials
When `exploring slat wall panel types`, you'll encounter a variety of materials and designs, each suitable for different `installation methods`. The most common are `wood slat panels` made from MDF or plywood with real wood veneers. These often come pre-assembled with a felt backing, designed for direct screw or adhesive application. Other variations include solid wood options, which can offer a more robust finish but might require slightly different cutting and fastening techniques. Understanding the `material considerations` – such as weight, density, and finish – is vital. For instance, `felt-backed acoustic panels` are generally lighter and simpler to install than solid wood alternatives, directly impacting the `installation process`.
Key Considerations Before Starting Your DIY Projects
Embarking on `DIY projects` like `slat wall panel installation` requires careful planning. Before you purchase any materials, consider these `pre-installation checks`. First, accurately `measuring walls` is non-negotiable to determine the exact quantity of panels needed, ensuring you don't over or under-order. Factor in waste for cuts and errors. Second, assess the `surface preparation` required for your chosen wall. Is it smooth and clean? Will it need priming or leveling? Finally, consider the `tools for slat wall installation` you'll need – a level, measuring tape, saw, drill, and appropriate fasteners. Having these ready prevents delays. For those seeking high-quality, easy-to-install options that simplify the entire process of `how to install slat wall panels`, especially if you're aiming for superior aesthetics and acoustics, exploring premium `acoustic wood panels` can save you time and ensure a professional finish. These types of panels are often designed with simpler installation in mind, directly addressing many common DIY challenges. You can find excellent options and detailed product specifications for your project requirements here: high-quality acoustic wood panels.
【Selecting the Perfect Slat Wall Panels for Your Space】
Building on the foundation of our initial preparations, the next crucial step in `how to install slat wall panels` effectively in 2025 is making an informed decision about the panels themselves. Your choice of `slat panel type` will directly influence the `installation methods`, aesthetic outcome, and even the acoustic performance of your finished project. This section serves as a comprehensive `panel selection guide`, helping you navigate the diverse options available and understand their implications for your `DIY home improvement` journey.
Decoding Slat Wall Panel Materials and Features
To successfully `install slat wall panels`, it's essential to first understand the fundamental `slat wall panel materials` and their inherent `features`. Each material offers distinct advantages and presents unique considerations for `installation` and long-term performance. Knowing these characteristics upfront ensures you select the optimal `panel composition` for your specific needs, whether it's for `visual appeal`, `acoustic enhancement`, or `durability`.
How to Install Wood Slat Wall Panels: MDF, Oak, and Walnut Options
When considering `wood slat wall panels`, you'll primarily encounter options made from engineered wood products like MDF (Medium-Density Fiberboard) or plywood, often topped with real wood veneers such as `oak` or `walnut`. These are among the most popular choices for `interior design` projects due to their aesthetic versatility and relative ease of `installation`.
- MDF-Core Slat Panels: These are typically the most common and cost-effective. MDF is stable, consistent, and easy to cut cleanly with standard woodworking tools. This makes `installing MDF slat panels` quite straightforward for DIY enthusiasts. The panels are usually pre-finished with a veneer (like `oak veneer` or `walnut veneer`) and often come with a felt acoustic backing, simplifying the overall `panel assembly` process.
- Solid Wood Slat Panels: While less common for full systems, some `slat designs` utilize solid `oak slat panels` or `walnut slat panels` for a more premium, robust feel. These are denser, heavier, and more durable, offering a luxurious finish. However, `installing solid wood panels` may require more robust fasteners and careful handling due to their weight and potential for expansion/contraction with humidity changes. Cutting solid wood accurately also demands higher-quality tools.
- Plywood-Core Slat Panels: Similar to MDF, plywood offers a good balance of stability and strength. It's generally lighter than solid wood and can be a good choice for `wood paneling projects` where weight is a concern.
Understanding these `wood material considerations` directly impacts your `installation plan`, from tool selection to fastening techniques. For a seamless and aesthetically pleasing finish with `wood slat panels`, especially those designed for straightforward installation and superior visual impact, exploring high-quality options is a smart investment that can simplify your `DIY wood panel installation`.
Beyond Wood: WPC and PVC Slat Wall Panel Types and Benefits
While `wood slat panels` dominate the market, alternative `slat wall panel types` like WPC (Wood-Plastic Composite) and PVC (Polyvinyl Chloride) are gaining traction, particularly for specific applications. These `non-wood slat panels` offer unique `benefits` that can simplify `installation` in certain environments and expand the possibilities of where `wall paneling` can be applied.
- WPC Slat Panels: `WPC (Wood-Plastic Composite) panels` combine wood fibers with recycled plastics, creating a durable, water-resistant, and low-maintenance material. They often mimic the look of natural wood but without the same susceptibility to moisture or pests. `Installing WPC panels` is typically similar to `wood panels`, often involving screws or adhesives, but their moisture resistance makes them ideal for bathrooms, kitchens, or even outdoor applications where `wood panels` might degrade. Their dimensional stability can also make for a more consistent `installation process`.
- PVC Slat Panels: `PVC slat panels` are entirely synthetic, offering excellent waterproofing, mold resistance, and extreme durability. They are generally lightweight and very easy to clean, making them suitable for high-moisture areas or commercial spaces. `Installing PVC panels` often involves interlocking systems or adhesive application, making them quick to put up. While they might not offer the natural warmth of wood, their practicality and `panel benefits` like being `fully waterproof` and `lightweight` can be significant advantages for specific `home renovation projects`.
Considering these `material benefits` beyond traditional wood is crucial, as they can directly influence the longevity and suitability of your `wall panel installation` for various environments in 2025.
Understanding Acoustic Properties and Slat Wall Panel Thickness
Beyond aesthetics and material composition, two critical `slat wall panel features` to consider during your `selection process` are their `acoustic properties` and `slat wall panel thickness`. These attributes profoundly impact both the functional performance and the visual depth of your `wall paneling project`. Understanding these details is vital for achieving optimal `room acoustics` and desired `visual appeal`.
Installing Acoustic Slat Panels: Enhancing Your Sound Environment
Many `slat wall panels` are specifically designed with `acoustic properties` in mind, making them an excellent choice for `enhancing your sound environment`. These `acoustic slat panels` typically feature a felt or fabric backing behind the wooden slats. This backing material is key to their `sound absorption capabilities`.
- How Acoustics Work: The gaps between the slats, combined with the porous felt backing, work together to absorb sound waves rather than reflecting them. This significantly reduces `echo` and `reverberation` within a room, leading to a much quieter and more comfortable space. This `soundproofing` effect is invaluable for home theaters, living rooms, offices, or any area where `noise reduction` is desired.
- Installation for Acoustics: `Installing acoustic slat panels` follows much the same process as standard panels – often involving screws into battens or direct adhesive application. The felt backing also provides an additional layer of stability during `panel installation`. For optimal `acoustic performance`, ensuring a small air gap behind the panel (often created by battens or the panel's design) can further enhance `sound absorption`.
For those prioritizing superior sound management and premium aesthetics in their living or working spaces, exploring dedicated `acoustic slat panel` options can significantly elevate your space. Products engineered for `sound dampening` offer specific design features, such as integrated felt backing, that streamline the `installation of acoustic panels` while maximizing `sound absorption` capabilities, directly addressing the need for better `room acoustics`. For an ideal solution that marries both visual elegance and profound sound reduction, consider investing in panels specifically designed for `acoustic treatment`. You can find excellent options and detailed product specifications for enhancing your sound environment here: Barrisound Acoustic Solid Wood Slat Wall Panels - Smoked.
Slat Wall Panel Thickness for Installation: Impact on Durability and Aesthetics
The `slat wall panel thickness` is a subtle yet significant factor that influences both the `durability` and `aesthetics` of your `panel installation`. Standard `panel thicknesses` can range from a few millimeters for thin decorative veneers to several centimeters for robust, `solid wood panels`.
- Impact on Durability: Thicker `slat panels` generally offer greater `structural integrity` and `durability`. They are less prone to warping, bending, or damage from impacts. If your `wall paneling` is in a high-traffic area or subject to potential wear and tear, opting for a `thicker panel` can provide a more resilient and long-lasting finish. Thicker panels also allow for more secure `fastening options`, potentially simplifying `installation` by providing a stronger substrate for screws.
- Impact on Aesthetics: `Panel thickness` plays a crucial role in creating the visual depth and shadow lines that are characteristic of `slat wall designs`. Thicker slats create more pronounced shadows and a bolder, more substantial appearance. This can significantly enhance the `visual appeal` of your space, adding a sense of luxury and architectural interest. Conversely, thinner slats offer a more minimalist or subtle look. When making your `panel selection`, consider how the `panel's profile` will integrate with your overall `interior design` vision. The `thickness of your acoustic slat panels` is also a key component in their `sound absorption efficiency`, contributing to overall `room acoustics` and the final `installation aesthetics`.
【Essential Tools and Preparation for Slat Wall Installation】
Having carefully selected your ideal `slat wall panels` based on material, acoustics, and thickness, the next critical phase in `how to install slat wall panels` effectively in 2025 involves assembling the right `toolkit` and meticulously preparing your `installation area`. Proper preparation is not just a recommendation; it's the bedrock of a successful, professional-looking `DIY slat wall project`. This section will guide you through gathering every `essential tool` and executing crucial `site preparation` steps, ensuring your `wall panel installation` proceeds smoothly and yields impeccable results.
Gathering Your Toolkit: Tools Needed for Slat Wall Panels
A well-equipped `toolkit` is fundamental for efficient and precise `slat wall installation`. Knowing which `tools needed for slat wall panels` are essential for your specific project will save you time, reduce frustration, and prevent costly errors. Let's break down the `equipment required` for this `home improvement task`.
Basic Tools Required for Most Slat Wall Panels
Regardless of the `slat wall panel type` you've chosen, a core set of `basic tools` will be indispensable. These `fundamental installation tools` are common for most `paneling projects` and ensure a precise and secure fit.
- Measuring Tape: A reliable `measuring tape` is crucial for accurate dimensions. This tool ensures your `slat wall panel measurements` are precise, leading to fewer cuts and less material waste.
- Spirit Level or Laser Level: To achieve a perfectly straight and `level slat wall`, a `spirit level` (at least 2-4 feet long) or a `laser level` is non-negotiable. These `leveling tools` guarantee your panels are installed plumb and true, which is vital for `professional installation results`.
- Stud Finder: Locating wall studs is critical for secure `panel mounting`. A `stud finder` helps identify the `framing members` behind your drywall, allowing you to anchor `slat panels` directly into stable `wooden studs` for maximum support.
- Pencil or Marking Tool: For marking cut lines, drill points, and stud locations, a simple `pencil` or carpenter's marker is essential for clear `panel layout`.
- Drill/Driver: A `cordless drill` or `impact driver` is needed for pre-drilling holes (if required) and driving screws. Ensure you have the appropriate `drill bits` and `driver bits` for your specific fasteners.
- Utility Knife: For scoring and cutting felt backings on `acoustic panels` or making light trims. A `sharp utility knife` is a versatile tool for various `trimming tasks`.
- Caulk Gun (with appropriate adhesive/sealant): If using adhesive for `panel attachment` or for sealing gaps, a `caulk gun` is necessary for controlled application of `construction adhesive`.
- Safety Glasses and Gloves: Always prioritize `personal protective equipment`. `Safety glasses` protect your eyes from debris, and `gloves` can prevent splinters and provide a better grip.
Having these `essential tools` on hand will prepare you for the majority of `slat wall installations` and streamline your `DIY wall cladding project`.
Specialized Tools for Specific Slat Wall Panel Types: Cutting Guide and More
While the basic tools cover general `installation requirements`, certain `slat wall panel types` or specific cutting needs may demand `specialized tools`. Understanding these `advanced tools` can significantly improve the `precision` and `efficiency` of your `panel cutting` and `attachment process`.
- Miter Saw or Circular Saw with Fine-Tooth Blade: For precise, clean cuts, especially across multiple slats or for angled cuts, a `miter saw` or a `circular saw` fitted with a `fine-tooth blade` (like a 60-tooth or 80-tooth blade) is highly recommended. This is crucial for `cutting wood slat panels`, `MDF panels`, and even `WPC panels` without splintering. A `track saw` can also offer unparalleled `cutting precision` for long, straight cuts.
- Jigsaw: For intricate cuts around outlets, switches, or architectural features, a `jigsaw` with a wood-cutting blade is invaluable. This allows for `custom panel fitting` in challenging areas.
- Router (optional): For creating custom edges, dados, or rebates if you are fabricating your own `slats` or modifying existing panels. This `woodworking tool` is for more advanced `DIYers`.
- Panel Saw or Table Saw (for large projects): If you are undertaking a very large `wall paneling project` and need to cut full sheets of `slat material` repeatedly, a `panel saw` or `table saw` will provide the most efficient and accurate cuts.
- Adhesive Spreader/Notched Trowel: If you are using contact adhesive or a generous amount of `liquid nails`, an `adhesive spreader` or `notched trowel` ensures even application for strong `panel bonding`.
Investing in the right `specialized tools`, particularly for `cutting wood panels` or handling larger `slat wall dimensions`, can make a significant difference in the final aesthetic and durability of your `installation`. For `acoustic slat panels` that require precise cuts and seamless integration, using appropriate `cutting tools` is paramount to maintaining their structural integrity and sound-absorbing properties. Understanding that high-quality `acoustic wood panels` are designed for both aesthetic appeal and `sound dampening` means their successful installation hinges on precise handling. To ensure your investment in superior sound management and exquisite design yields the best results, equipping yourself with the right tools for cutting and installing these premium materials is key. For a comprehensive look at `luxury acoustic wood slat wall panels` that exemplify quality and ease of installation, you can explore product specifications and visual examples that will enhance your understanding of material requirements for optimal `sound absorption` here: Acoustic Wood Slat Panels.
Measuring and Preparing Your Installation Area
Once your `toolkit` is ready, the focus shifts to the `installation area`. `Measuring and preparing your walls` thoroughly are crucial pre-installation steps that prevent issues down the line. Proper `wall preparation` ensures a smooth, secure, and visually pleasing `slat wall finish`.
Slat Wall Panel Measurement Tips for Precision
Accurate `slat wall panel measurement` is fundamental for a seamless `installation`. Taking precise measurements minimizes material waste and ensures your `wall panels` fit perfectly, enhancing the overall `visual appeal`.
- Measure Twice, Cut Once: This timeless adage holds true for `slat wall projects`. Measure the height and width of your `installation area` at several points to account for any discrepancies in wall squareness.
- Account for Obstructions: Identify and measure around any `obstacles` like light switches, outlets, windows, or doors. You'll need to cut your `slat panels` to fit neatly around these `architectural features`.
- Plan Your Layout: Before cutting any `slats`, sketch out your `panel layout` on the wall or on paper. Decide where the seams will fall, how `full panels` will be placed, and where `cut panels` will be positioned. This `pre-planning` helps visualize the final outcome and ensures `consistent slat spacing`.
- Consider Expansion Gaps: For `wood slat panels`, especially `solid wood`, consider leaving a small `expansion gap` (e.g., 1/8 inch or 3mm) at the top, bottom, and corners. This `thermal expansion gap` allows for natural material movement due to changes in temperature and humidity, preventing `panel warping` or `buckling` in 2025.
- Use a Level Line as a Guide: Mark a `level reference line` on your wall, starting from where your first panel will be installed. This `guideline` is paramount for ensuring all subsequent `slat panels` are perfectly straight.
By meticulously following these `measurement tips`, you lay the groundwork for a highly `accurate` and `visually appealing slat wall installation`.
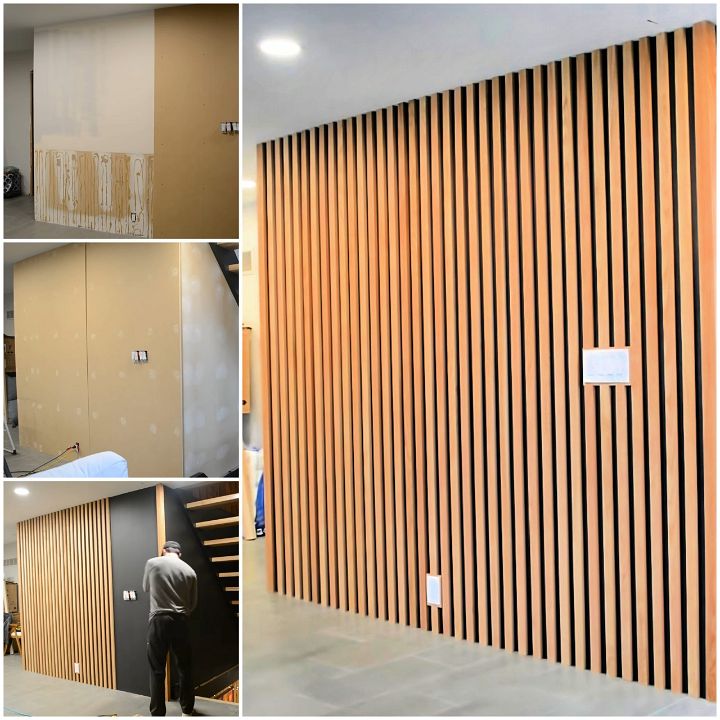
Preparing Your Walls: Cleaning, Leveling, and Removing Obstructions
The condition of your `underlying wall surface` directly impacts the success and longevity of your `slat wall installation`. Thorough `wall preparation` ensures optimal adhesion and a secure `mounting surface`.
- Clean the Wall Surface: Begin by `cleaning your walls` thoroughly. Remove any dust, dirt, grease, or grime. A simple wipe-down with a damp cloth and mild detergent, followed by drying, is usually sufficient. A `clean surface` is essential for `adhesive bonding`.
- Repair and Level Imperfections: `Leveling walls` is critical. Fill any significant holes, cracks, or indentations with `spackle` or `drywall compound`. Sand down any bumps or uneven areas. `Smooth walls` ensure that the `slat panels` lie flat and flush, preventing unsightly gaps or wobbles. Use a `straightedge` to check for flatness across the wall.
- Remove Obstructions: Temporarily remove any `wall obstructions` such as outlet covers, switch plates, light fixtures, or existing trim that might interfere with the `panel installation`. Remember to turn off the power at the breaker before handling electrical outlets. Label any `removed items` for easy reinstallation.
- Prime if Necessary: If your wall surface is porous, extremely dark, or has stains, applying a `primer` can improve `adhesive adhesion` and provide a uniform base. This is particularly important for `DIY wall paneling projects` where `surface consistency` is desired.
- Identify Stud Locations: Re-verify and mark the locations of your `wall studs` using your `stud finder`. These `stud markings` will serve as your anchoring points for screws, providing maximum `structural support` for your `slat wall panels`.
By dedicating sufficient time to `preparing your walls` – ensuring they are clean, level, and free of obstacles – you set the stage for a durable and aesthetically pleasing `slat wall installation` that will stand the test of time in 2025.
【Step-by-Step: How to Install Slat Wall Panels Effectively】

You've gathered your tools and meticulously prepared your wall. Now, it's time for the practical application of `how to install slat wall panels` successfully. This section provides a clear, step-by-step guide to achieving a professional-grade finish, covering everything from `panel attachment methods` to ensuring `perfect alignment` and tackling common `installation challenges` in 2025. Follow these `DIY slat wall installation steps` to transform your space with confidence and precision.
The DIY Slat Wall Panel Installation Steps
Executing the `slat wall panel installation` effectively requires a systematic approach. Understanding the various `attachment options` and their implications is paramount for a durable and aesthetically pleasing result. This comprehensive guide will walk you through the `installation process`, ensuring your `wall paneling project` meets high standards.
Best Way to Install Slat Wall Panels: Adhesive vs. Screw Systems
Deciding on the `best way to install slat wall panels` hinges on several factors: the `panel material`, the `wall type`, desired permanence, and even the `acoustic properties` you wish to maintain. The two primary `fastening methods` are `adhesive installation` and `screw fixation`. Each offers distinct advantages for your `wall cladding`.
- Adhesive Installation (Liquid Nails/Construction Adhesive):
- Pros: This method, often utilizing `construction adhesive` or `liquid nails`, offers a clean, fastener-free finish, ideal for `smooth walls` where you want a seamless look. It's generally quicker for initial application and reduces the need for extensive `pre-drilling`. `Acoustic slat panels` benefit as screws can sometimes create sound bridges if not properly isolated.
- Cons: It's a highly permanent solution. Removing `adhesive-mounted panels` can damage the underlying wall surface. It requires sufficient drying time and is less forgiving if precise adjustments are needed after placement. It's not recommended for `heavily textured` or `uneven walls` without prior `surface preparation`.
- Ideal for: Lightweight `MDF slat panels`, `acoustic felt-backed panels`, and situations where minimal visible hardware is desired.
- Screw System (Mechanical Fasteners):
- Pros: `Screw fixation` provides an incredibly secure and robust `panel mounting`. It allows for easier removal or repositioning of panels if needed, making it suitable for temporary installations or areas prone to moisture. When anchoring into `wall studs`, it offers superior `structural support`, especially for `solid wood slat panels` or heavier `composite panels`.
- Cons: Screws are visible unless countersunk and filled, or concealed within the slat grooves. It requires precise `stud finding` and `pre-drilling` to prevent `wood splitting` or `drywall damage`. The installation can be more time-consuming.
- Ideal for: `Solid wood slat panels`, `heavy wood panels`, `commercial installations`, or any situation demanding maximum `holding power` and potential future adjustability.
Many `professional installers` opt for a hybrid approach: using a small amount of `construction adhesive` for immediate grip and then reinforcing with screws into studs for long-term security. This `dual-attachment method` combines the best of both worlds for your `wall panel project`.
Slat Wall Panel Adhesive Recommendations for Different Surfaces
Choosing the right `slat wall panel adhesive` is critical for ensuring secure bonding and longevity, especially when opting for a fastener-free aesthetic. Different `wall surfaces` and `panel types` require specific `bonding agents` for optimal results.
- For Drywall and Plaster Walls:
- Recommendation: High-strength `construction adhesive` (e.g., PL Premium, Liquid Nails Heavy Duty). These `panel adhesives` offer excellent initial grab and cure to a very strong bond.
- Application Tip: Apply adhesive in a serpentine pattern or parallel beads on the back of the `slat panel`. Ensure the wall surface is clean, dry, and free of dust. Priming is recommended for `porous plaster`.
- For Concrete and Masonry Surfaces:
- Recommendation: `Polyurethane-based construction adhesives` or `epoxy adhesives`. These `heavy-duty bonding agents` are formulated for `non-porous surfaces` and provide superior adhesion on `concrete walls`, resisting moisture and temperature fluctuations.
- Application Tip: The wall must be fully cured, clean, and dry. For very rough `masonry surfaces`, consider a leveling coat first to ensure full contact.
- For Painted Walls (Latex or Oil-Based):
- Recommendation: Ensure the paint is well-adhered and not peeling. A high-quality `panel adhesive` or `multi-purpose construction adhesive` should work.
- Application Tip: Lightly scuffing the painted surface with fine-grit sandpaper can improve `adhesive grip`. Always test a small, inconspicuous area first to ensure compatibility.
- For Bathrooms or High-Moisture Areas (with appropriate panel material):
- Recommendation: `Moisture-resistant construction adhesive` or `silicone-based adhesive`. These `waterproof adhesives` provide a durable bond that can withstand humidity.
- Application Tip: Ensure the `slat panel material` itself is suitable for wet environments (e.g., `WPC panels` or `treated wood`). Proper ventilation is still crucial.
Always check the `adhesive manufacturer's instructions` for specific curing times, temperature ranges, and surface compatibility. Proper `adhesive application` is key to preventing `panel delamination` and ensuring a lasting finish for your `slat wall panels`.
Mastering the Slat Wall Panel Leveling Process
Once you've decided on your `attachment method` and chosen your adhesive, the next crucial step is `mastering the slat wall panel leveling process`. Achieving `perfect alignment` is paramount for a professional and visually appealing `slat wall installation`. Any deviation from level or plumb will be highly noticeable in the finished product, affecting the `visual continuity` of your `decorative panels`.
Tips for Installing Slat Wall Panels Yourself: Ensuring Perfect Alignment
Ensuring `perfect alignment` when you're `installing slat wall panels yourself` requires patience and precision. These `DIY tips` will guide you in maintaining `straight lines` and `even spacing` throughout your `paneling project`.
- Start with a Laser Level (Recommended) or Long Spirit Level: Before you attach the first panel, use a `laser level` to project a perfectly `level line` on your wall. This will serve as your primary `guideline` for the bottom edge of your first panel. If using a `spirit level`, ensure it's at least 4 feet long for accurate readings across the panel.
- Establish a Plumb Line: Just as important as level is plumb (vertical straightness). Use your `laser level` or a `plumb bob` to mark a `vertical guideline` for the edge of your first panel. This ensures your initial panel is straight in both dimensions, setting the standard for subsequent `panel installations`.
- Install the First Panel Meticulously: The `first slat panel` is the foundation. Take extra time to ensure it is perfectly `level and plumb` according to your marked guidelines. This panel dictates the alignment of all subsequent `acoustic panels` or `decorative wood panels`.
- Check Periodically with Your Level: As you continue installing `slat panels`, pause frequently to check both horizontal and vertical alignment with your `spirit level` or `laser level`. Even minor deviations can accumulate and become prominent over a large surface.
- Use Spacers (If Applicable): If your `slat wall panels` have a consistent gap between slats, consider using `spacers` or shims to maintain `uniform spacing` between panels if they are installed side-by-side without overlapping systems. This ensures visual consistency.
- Apply Consistent Pressure (for Adhesive): If using `adhesive`, apply firm, even pressure across the entire panel for the recommended time to ensure maximum contact and bond. Use a roller or even a clean cloth to press panels firmly against the wall.
By diligently following these `alignment tips`, you will achieve a `straight installation` that looks professionally done, enhancing the `aesthetic appeal` of your `finished slat wall`.
Dealing with Challenges: Uneven Walls and L-Shapes
Even with meticulous preparation, `installation challenges` can arise. Knowing `how to deal with uneven walls` and `L-shape corners` is crucial for a seamless `slat wall finish`. These `difficult installations` often require creative solutions and attention to detail.
- Uneven Walls:
- Issue: Many older homes have `uneven wall surfaces` or `bowing walls`, which can cause `slat panels` to not lie flat, leading to unsightly gaps or pressure points.
- Solution:
- Shimming: For minor imperfections, use small `shims` (thin pieces of wood or plastic) behind the `slat panel` at high spots to bridge gaps and ensure the panel lies flat. Secure shims with adhesive or small fasteners.
- Filler/Patching: For larger depressions or `uneven areas`, `skim coating` the wall with `drywall compound` or `spackle` before installation can create a smoother surface. This `wall leveling technique` is ideal for significant discrepancies.
- Flexible Adhesives: Some `construction adhesives` have a slight gap-filling capability, which can help with very minor surface irregularities.
- Expert Tip: Prioritize leveling the wall during the `preparation phase`. It's much easier to fix an uneven wall before the `panels are mounted`.
- L-Shapes and Corners:
- Issue: Wrapping `slat wall panels` around internal or external `L-shape corners` requires precise cutting and careful alignment to maintain continuity.
- Solution:
- Miter Cuts: For a seamless `corner joint` on external `L-shapes`, make `45-degree miter cuts` on the edges of the panels that meet at the corner. This creates a clean, almost invisible `corner detail`. Use a `miter saw` for precision.
- Butt Joints: For internal corners, you can typically use a `butt joint`, where one panel runs flush into the other. Ensure the edge of the butting panel is perfectly straight.
- Corner Trim: If precise cuts are challenging, or you prefer a more defined edge, `corner trim pieces` (like `quarter-round` or `corner bead`) can be installed over the `panel seams` to create a neat finish.
- Pre-planning: Always measure `corner dimensions` meticulously and `dry-fit` your cut panels before applying adhesive or screws. This `pre-planning` step is vital for `complex installations`.
Addressing these `installation challenges` proactively will ensure your `slat wall project` looks professional and durable, even in less-than-ideal conditions. For `acoustic slat panels` that demand precise installation to maintain their sound-dampening properties and aesthetic excellence, choosing the right tools and understanding these techniques is paramount. High-quality `wood slat panels` are an investment in both style and sound performance, making accurate installation critical. To explore `luxury acoustic solid wood slat wall panels` designed for superior performance and elegant integration, which benefit greatly from these detailed installation methods, please visit: Barrisound Acoustic Solid Wood Slat Wall Panels - Smoked.
【Advanced Techniques and Finishing Touches for Slat Walls】
Having mastered the foundational `slat wall panel installation` steps and understood the intricacies of `perfect alignment` and `dealing with challenges`, it's time to elevate your project. This section delves into `advanced techniques` and crucial `finishing touches` that transform a basic `slat wall` into a truly integrated and polished design element. From cleverly `hiding unsightly wires` to achieving pristine `edge finishes` and exploring diverse `slat wall applications`, these insights will ensure your 2025 `wall paneling project` achieves a professional and seamless result.
Creative Solutions: Integrating Slat Walls into Your Design
Beyond simply covering a wall, `slat panels` offer immense potential for creative `interior design integration`. Thinking outside the box allows you to leverage their aesthetic and functional benefits to solve common household dilemmas and enhance overall `room aesthetics`.
How to Hide Wires with Slat Wall Panels: A Practical Case Study
One common challenge in modern `living spaces` and `home offices` is managing and `concealing wires` from televisions, sound systems, and other electronics. `Slat wall panels` provide an elegant and practical `cable management solution`.
Practical Case Study: The Integrated Media Wall
Imagine a `living room` featuring a wall-mounted television and a soundbar. Typically, cables for power, HDMI, and audio run visibly down the wall, disrupting the clean lines of your `interior decor`.
- Pre-Installation Planning: Before `installing slat wall panels`, identify all cables that need `concealment`. Mark their entry and exit points on the wall.
- Creating a Cable Channel: For `wood slat panels` (especially those with a backing felt), you can often route thinner cables (e.g., HDMI, optical audio) directly behind the paneling within the space between the panel's slats and the wall surface. For thicker cables or multiple wires, consider cutting shallow channels into the drywall or mounting a slim conduit directly onto the wall before panel installation. This `wire hiding technique` is crucial for a clean look.
- Panel Modification: For `acoustic slat panels` that feature a solid backing, you might need to strategically drill small, discreet holes at the top and bottom of a `slat panel` section. These holes allow cables to enter behind the panel at the top (e.g., from a wall-mounted TV) and exit at the bottom (to connect to a power outlet or media console).
- Recessed Outlets: For the ultimate `integrated design`, consider installing a recessed power outlet and media box behind where the TV will sit. This allows all connections to be made within the wall, with only minimal cable access points needed at the `slat panel` surface.
- Finishing: Once the `slat wall panels` are `mounted securely` and wires are routed, the visible clutter disappears, leaving a sleek, modern `feature wall` that enhances your `entertainment center`. This `slat wall wire concealment` strategy is a game-changer for `modern interiors`.
This `integrated solution` not only improves the visual appeal of your `media wall` but also makes your `living space` feel more organized and sophisticated.
How to Finish Slat Wall Edges for a Polished Look
The way you `finish slat wall edges` significantly impacts the overall `polished look` of your `decorative panels`. Unfinished edges can detract from even the most perfectly `installed slat wall`. Achieving a professional appearance involves careful consideration of your `edge treatment`.
- No Trim / Seamless Edge:
- Method: This involves cutting the `slat panels` precisely to fit flush against an an adjacent wall, ceiling, or floor, with no additional `trim pieces`.
- Pros: Creates a minimalist, highly contemporary aesthetic, emphasizing the `slat panel design`.
- Cons: Requires extremely accurate measurements and precise, straight cuts using a high-quality saw (e.g., `track saw` or `table saw`). Any gaps will be visible. Not suitable for `uneven wall surfaces`.
- Tip: Use a fine-tooth blade to prevent chipping of `wood veneer` or `MDF edges`.
- Matching Trim Pieces / End Caps:
- Method: Custom-made `trim pieces` or pre-fabricated `end caps` designed to match the `slat panel material` are installed along the exposed edges. These are typically cut from the same `wood veneer` or painted to match the `slat color`.
- Pros: Provides a cohesive and `finished look`, effectively concealing any minor imperfections in the `panel edge cuts`. Offers a clean, intentional border for your `wall cladding`.
- Cons: Adds an extra step to the `installation process` and requires additional material.
- Tip: Secure `trim pieces` with small finishing nails or `construction adhesive` for a strong bond.
- Contrasting Trim:
- Method: Instead of matching, choose `trim pieces` in a contrasting material (e.g., brushed metal, painted MDF, or a different wood species) or color to frame the `slat wall`.
- Pros: Creates a distinct visual boundary and can be a design feature in itself, highlighting the `slat wall` as an `accent piece`.
- Cons: Requires careful selection to ensure the contrast enhances, rather than detracts from, the overall design.
- Tip: Consider the existing `room decor` and color palette when choosing `contrasting trim`.
- Caulking and Filler:
- Method: For very small gaps where the `slat panel` meets an existing wall, ceiling, or door frame, use paintable caulk or wood filler.
- Pros: Quickly fills minor gaps, providing a neat, sealed edge.
- Cons: Not suitable for large gaps or structural support.
- Tip: Apply caulk sparingly and smooth immediately with a wet finger or tooling tool for a clean line.
By paying close attention to these `edge finishing techniques`, your `slat wall installation` will achieve a truly `polished` and professional appearance, enhancing your entire `interior design project` in 2025.
Slat Wall Panel Applications for Rooms and Beyond
`Slat wall panels` are remarkably versatile, offering `aesthetic and acoustic benefits` across a myriad of `applications`. Understanding where and how to deploy them can significantly elevate the functionality and `visual appeal` of various spaces.
Residential Slat Wall Panel Installation Process: Enhancing Living Spaces
The `residential slat wall panel installation process` is increasingly popular for `enhancing living spaces` through both visual interest and improved `room acoustics`. From `master bedrooms` to `home entertainment areas`, these `decorative panels` offer transformative potential.
- Living Room Accent Walls: `Slat wall panels` are ideal for creating a stunning `feature wall` behind a sofa or an `entertainment unit`. Their linear pattern adds texture and depth, making the `living room` feel more dynamic. For `open-plan living spaces`, they can subtly define zones.
- Bedroom Feature Walls / Headboards: Install `slat panels` behind the bed to create a luxurious and contemporary `headboard alternative` or an entire `feature wall`. This brings warmth and sophistication, enhancing `bedroom decor`.
- Home Office Design: In a `home office`, `acoustic slat panels` can significantly reduce echo and improve sound clarity, making virtual meetings more professional. Visually, they create a polished and stimulating backdrop for your workspace, ideal for `video conferencing`.
- Dining Areas: `Slat walls` can add a modern touch to `dining rooms`, creating an inviting atmosphere. They can serve as a backdrop for artwork or dining room furniture.
- Hallways and Entryways: Use `slat panels` to add character to often-overlooked spaces like `hallways` and `entryways`, making them feel more welcoming and stylish. They can also protect walls in high-traffic areas.
In each application, the `slat panel` not only provides a `stylish aesthetic` but, especially with `acoustic backing`, can contribute to better `sound absorption`, making spaces more comfortable and functional.
Budget-Friendly Slat Wall Installation Ideas for Every Home
While `luxury wood slat panels` can be an investment, achieving the `slat wall look` doesn't always require a hefty budget. There are many `budget-friendly slat wall installation ideas` that allow `DIY enthusiasts` to transform their homes `cost-effectively`.
- Partial Wall Accent: Instead of covering an entire wall, opt for a `smaller accent section`. A horizontal band behind a bed, a vertical strip flanking a fireplace, or a compact `feature wall` in a `reading nook` can deliver significant visual impact without the expense of full-wall coverage. This reduces material and `installation costs`.
- MDF Slat Panels: While `solid wood panels` offer premium quality, `MDF slat panels` (medium-density fiberboard) are a more `affordable paneling option`. They can be painted or laminated to mimic wood grain, offering a similar aesthetic at a fraction of the price. This is a common `DIY slat wall solution`.
- Paint Your Own: Purchase plain, un-veneered `MDF strips` or even simple wood furring strips, then paint them the desired color. This allows for complete customization and can significantly reduce the cost compared to pre-finished panels.
- DIY Slat Wall from Plywood: For the ultimate `budget DIY`, cut a sheet of plywood into individual strips. While more labor-intensive, this allows for `custom slat widths` and spacing, and the raw wood can be stained or painted to your preference.
- Adhesive-Only Installation: If your `wall surface` is smooth and suitable, relying primarily on `construction adhesive` can save on the cost and time associated with purchasing and installing numerous screws or fasteners. Always ensure the adhesive is appropriate for your `panel material` and `wall type`.
- Reclaimed Materials: For a rustic or industrial look, consider sourcing `reclaimed wood` or `pallet wood` to create `slats`. This is a highly `sustainable` and `cost-effective approach`, though it requires more preparation (cleaning, sanding).
These `cost-effective installation ideas` empower homeowners to achieve a stylish `slat wall` without breaking the bank, demonstrating that `aesthetic enhancements` are accessible on any `home improvement budget`. For those seeking `premium acoustic solid wood slat wall panels` that offer unparalleled sound dampening and exquisite natural beauty, and are designed for a seamless, luxurious finish, explore options that pair perfectly with these advanced installation techniques. Discover `luxury acoustic solid wood slat wall panels` crafted for exceptional performance and timeless design: Barrisound Acoustic Solid Wood Slat Wall Panels - Smoked.
【Addressing Your Slat Wall Panel Installation Queries】

As you consider enhancing your space with `slat wall panels`, it's natural to have questions about the `installation process`, `longevity`, and `maintenance`. This section aims to provide clear, practical answers to common inquiries, managing `expectations` and guiding you towards successful `wall paneling projects` in 2025.
Is Slat Wall Panel Installation Easy? Realities and Expectations
The question "Is `slat wall panel installation` easy?" doesn't have a simple yes or no answer. While the fundamental concept of `mounting panels` to a `wall surface` is straightforward, the overall `difficulty level` is influenced by several factors. Understanding these `realities` and setting accurate `expectations` is crucial before embarking on your `home improvement journey`.
Generally, for `DIY enthusiasts` with basic `tool knowledge` and a knack for `precision`, `slat wall installation` is achievable. However, it requires patience, meticulous measurement, and careful execution. The ease depends largely on the `panel type` (e.g., individual `slats` vs. pre-assembled `acoustic panels`), the `wall condition`, and the desired `finish quality`. A perfectly `level and plumb wall` simplifies the `installation considerably`, while `uneven surfaces` can pose significant `challenges`. Remember, `precision cuts` and `perfect alignment` are key to a professional-looking result.
Pros and Cons of DIY Slat Wall Panel Installation
Deciding whether to tackle `slat wall panel installation` yourself is a significant choice. Weighing the `advantages` against the `disadvantages` of a `DIY approach` will help you determine if it aligns with your `skill set`, `time availability`, and `budget`.
Pros of DIY Slat Wall Installation:
- Cost Savings: The most obvious benefit is significantly reducing `labor costs`. `Professional installation services` can add substantially to your overall `project budget`, making `DIY slat walls` a more `affordable home decor solution`.
- Personal Satisfaction: Completing a `home improvement project` like `wall paneling` yourself brings immense `personal satisfaction` and a sense of `accomplishment`. You'll have a tangible representation of your efforts.
- Flexible Scheduling: You can work at your own pace, fitting the `installation process` around your personal commitments without relying on a contractor's availability.
- Customization Control: A `DIY approach` gives you complete control over every detail, from `slat spacing` to `finish choices`, ensuring the `decorative panels` perfectly match your `interior design vision`.
Cons of DIY Slat Wall Installation:
- Time Commitment: `Slat wall installation` is not a quick task. It requires extensive `planning`, precise `measurement`, `cutting`, and `mounting`, which can be very `time-consuming`, especially for `larger walls` or `complex designs`.
- Tool Requirements: While some basic tools are common, achieving a `professional finish` often necessitates specialized equipment like a `miter saw`, `level`, `stud finder`, and potentially a `track saw`, which can be an initial `investment`.
- Potential for Mistakes: Errors in `measurement` or `cutting` can lead to `material waste`, `uneven alignment`, or a `subpar aesthetic outcome`. Rectifying `installation mistakes` can be frustrating and costly.
- Physical Demands: Depending on the `panel size` and `material weight`, `handling and mounting panels` can be physically demanding.
- No Professional Warranty: Unlike `professional installations` that often come with a `workmanship guarantee`, `DIY projects` offer no such security.
When to Call a Professional for Your Wall Paneling Project
While `DIY slat wall installation` is feasible, there are clear scenarios where enlisting a `professional installer` is not just convenient, but essential for `optimal results` and `peace of mind`. Knowing `when to hire an expert` can save you time, money, and frustration in the long run.
Consider calling a `wall paneling professional` if:
- Complexity is High: Your `design vision` includes `complex cuts`, `curved walls`, integrating `built-in lighting`, or navigating numerous `outlets` and `switches`. `Professional installers` possess the `expertise` and specialized tools for these `intricate projects`.
- Large-Scale Applications: For `entire rooms`, `multiple walls`, or `commercial spaces`, the sheer volume of work can be overwhelming for a `DIYer`. Professionals can complete `large projects efficiently` and to a `consistent standard`.
- Lack of Tools or Experience: If you don't own the necessary `power tools` or lack confidence in your `carpentry skills`, attempting a `slat wall installation` might lead to disappointment. `Hiring an expert` ensures the job is done right.
- Uneven or Challenging Walls: Walls that are `significantly out of plumb` or `uneven` require specialized techniques and shimming to ensure `slat panels` appear `straight and level`. Professionals are skilled at addressing these `structural challenges`.
- Desire for a Flawless Finish: For those who demand an absolutely `pristine, showroom-quality finish` without any visible imperfections, a `professional's attention to detail` and `precision` is invaluable.
- Time Constraints: If you have a strict deadline for your `interior renovation` or simply don't have the `time commitment` required for `DIY`, a `professional installation team` can complete the work much faster.
- Acoustic Optimization is Key: For `acoustic slat panel installations` where `sound dampening` performance is critical (e.g., `home theaters`, `recording studios`), a professional can ensure proper `installation techniques` to maximize `acoustic benefits`.
A `professional wall paneling service` offers `expert advice`, `efficient execution`, and `guaranteed quality`, ensuring your `slat wall project` in 2025 not only looks stunning but also performs optimally.
Longevity and Maintenance of Slat Wall Panels
Investing in `slat wall panels` means you want them to last and maintain their `aesthetic appeal` for years to come. The `longevity` of your `decorative panels` largely depends on the `quality of materials`, the `installation standard`, and consistent `maintenance`. Understanding how to care for your `slat wall` is key to preserving its beauty and functionality.
High-quality `slat wall panels`, particularly those made from `solid wood` or `durable MDF`, when properly `installed and maintained`, can last for decades. Factors like `humidity levels`, `direct sunlight exposure`, and the occasional `impact` can influence their `lifespan`. Choosing the right `panel material` for your specific environment is the first step in ensuring `durability`.
Ensuring Durability: Fire-Rated and Waterproof Options
For certain applications or environments, standard `slat wall panels` might not suffice. Ensuring `durability` goes beyond aesthetics, extending to `safety` and `resilience` against specific conditions. `Fire-rated` and `waterproof slat wall options` provide enhanced protection and expand the range of suitable `installation areas`.
- Fire-Rated Slat Wall Paneling:
- Purpose: Essential for `commercial settings`, `public spaces`, or any area where `fire safety regulations` are stringent. These `panels` are treated to resist ignition and slow the spread of flames.
- Materials: Typically `MDF` or `wood composite panels` infused with `fire-retardant chemicals` during manufacturing, meeting specific `building codes` and `safety standards` (e.g., Class A fire rating).
- Application: Ideal for `office lobbies`, `restaurants`, `hospitality venues`, and even `residential areas` requiring enhanced `fire protection`.
- Benefit: Provides crucial `peace of mind` and compliance with `safety protocols`, safeguarding occupants and property.
- Waterproof and Moisture-Resistant Slat Wall Options:
- Purpose: Designed for environments with `high humidity` or direct `water exposure`, preventing `warping`, `swelling`, `mold growth`, and `deterioration`.
- Materials: Options include `PVC slat panels`, `marine-grade plywood` (for a `DIY approach`), `composite materials`, or `wood panels` treated with `water-resistant sealants` and finishes. Some `laminate slat panels` also offer significant `moisture resistance`.
- Application: Perfect for `bathroom walls`, `kitchen backsplashes`, `basements`, `laundries`, and `spa areas`. Proper `ventilation` and `sealing` of edges are still crucial.
- Benefit: Allows the stylish `slat wall aesthetic` to be extended to areas previously considered unsuitable, without compromising on `durability` or `hygiene`.
When selecting `slat wall panels`, always consider the specific environmental conditions of your `installation site`. Opting for `fire-rated` or `waterproof panels` where appropriate ensures your `interior design feature` remains beautiful and functional for many years in 2025.
Tips for Maintaining Your Beautiful Interior Design Feature
Once your `slat wall panels` are `beautifully installed`, a simple `maintenance routine` will ensure they retain their `pristine appearance` and `structural integrity`. `Proper care` is crucial for `long-term durability` and `preserving the aesthetic appeal` of your `interior design feature`.
Here are practical `maintenance tips` for your `slat wall`:
- Regular Dusting: The linear design of `slat walls` can accumulate dust. Use a `microfiber cloth`, a `feather duster`, or a `vacuum cleaner` with a brush attachment to gently remove dust from the `slat surfaces` and in between the `slats` regularly. This prevents buildup and keeps the panels looking fresh.
- Gentle Cleaning for Stains: For any marks or light stains, use a soft, damp cloth. For `wood slat panels`, avoid harsh chemical cleaners, as they can strip finishes or damage the `wood veneer`. A mild soap solution (like diluted dish soap) can be used, but always wipe dry immediately to prevent `moisture damage`.
- Material-Specific Care:
- Natural Wood: Protect from `direct prolonged sunlight` to prevent `color fading`. Consider reapplying a suitable `wood conditioner` or `protector` every few years, especially for `solid wood slats`, to maintain their luster and prevent `drying out`.
- Painted/Laminated MDF: These are generally more forgiving. Clean with a damp cloth. Avoid abrasive cleaners or scrubbing pads that could scratch the surface.
- PVC/Composite: These are highly durable and easy to clean with water and and mild detergent.
- Humidity Control: In areas prone to `high humidity`, consider using a `dehumidifier`. Extreme fluctuations in `humidity` can cause `wood-based panels` to `expand or contract`, potentially leading to `warping` or `cracking` over time.
- Address Scratches and Dings: For minor `scratches` on `wood panels`, `wood repair markers` or `fillers` matched to the `wood tone` can be used. For `painted panels`, touch-up paint can conceal imperfections.
- Periodic Inspection: Occasionally, check for `loose slats` or `panels`. If secured with screws, gently tighten them if needed. Inspect for any signs of `moisture ingress` or `pest activity`, especially in `basements` or `exterior-adjacent walls`.
By following these `slat wall maintenance tips`, your `beautiful interior design feature` will remain a focal point of your home or office for many years to come, reflecting your commitment to quality and longevity. For those seeking premium `acoustic solid wood slat wall panels` that are not only beautiful but also engineered for superior sound dampening and long-term elegance, ensuring they complement these `advanced installation and maintenance techniques` perfectly, explore a range designed for sophisticated spaces: Barrisound Acoustic Solid Wood Slat Wall Panels - Smoked.
Embarking on a slat wall panel installation journey is a rewarding endeavor that can profoundly transform your living or working environment. We’ve meticulously explored every facet, from the initial pre-installation considerations to the crucial finishing touches, ensuring you have a comprehensive understanding of the process. The allure of slat wall paneling lies not only in its striking visual appeal—adding texture, depth, and a contemporary linear design—but also in its practical acoustic benefits, significantly reducing echo and reverberation for a more comfortable space.
Selecting the right panels is paramount; understanding various materials like MDF, oak, walnut, WPC, and PVC, alongside their unique features, impacts both aesthetics and durability. Crucially, recognizing the importance of acoustic properties and panel thickness ensures your chosen panels meet both your design aspirations and sound dampening needs, as exemplified by premium solutions such as Barrisound Acoustic Solid Wood Slat Wall Panels - Smoked, designed for superior performance.
Proper preparation is the bedrock of a successful project. Gathering essential tools—from basic measuring tapes and levels to specialized saws for precise cuts—and meticulously preparing your walls by cleaning, leveling, and identifying stud locations are indispensable steps. These foundational efforts directly contribute to a seamless and secure installation.
Executing the installation itself demands precision. We've detailed the primary attachment methods, whether through robust screw systems for maximum security or adhesives for a cleaner, fastener-free finish, noting how a hybrid approach often yields the best results. Mastering the leveling process, ensuring perfect alignment and addressing challenges like uneven walls or complex corners, is vital for a professional appearance.
Beyond the basics, embracing advanced techniques like cleverly concealing wires within the paneling and meticulously finishing edges with matching or contrasting trims elevates your project from a simple covering to an integrated design element. These creative solutions maximize both the aesthetic and functional potential of your new slat wall. Furthermore, understanding the diverse applications, from residential accent walls to budget-friendly DIY approaches using readily available materials, highlights the versatility of slat panels for any home.
Finally, managing expectations regarding installation ease—acknowledging both the immense satisfaction of DIY and the moments when professional expertise is invaluable—is key. Prioritizing longevity through material selection (like fire-rated or waterproof options) and adhering to a simple maintenance routine will ensure your beautiful interior design feature retains its pristine appearance and structural integrity for years to come. By applying these insights, you are now well-equipped to undertake your slat wall panel installation with confidence and achieve a truly transformative result.